KEEPING
DELTAS
DRIVING
Lancia Delta Integrale specialists and enthusiasts
a welding job
A lock-up neighbour has a Triumph TR7, and I think I've got problems! His car has been fitted with a Dolomite Sprint engine, that's the motor with the 16 valve head and a single cam, with long rockers operating 8 of the valves. Call me old fashioned, but what kind of penny pinching compromise is that?
I guess we've been spoilt with a lovely smooth twin cam, designed 20 years before that Triumph engine too.

A TR7
The TR7 has a seam on the front inside wheelarch where the curved top meets the cabin footwell, having seen this one, I assume this is a problem area for rot, this car had certainly rotted. The heavy underseal was using the inner carpet underlay, through the hole, as wheelarch material.
This needed welding, my neighbour asked me to have a go at it.
The first job was obviously to remove the wheel, jack up the front and rest the car on axle stands, then remove the rubber mud flap. Next get the hot air gun and scrape all the underseal off the area, this starts to show the extent of the corrosion.
Using an angle grinder and flap wheel, I then ground away all the old paint, rust and any underseal left on the metal.

Grinding back to the metal starts to show the full area of rot, I noticed then that there were two skins of metal, and there were wires running inside the car. I'd already pulled the carpet up inside, but not seen the wires in the corner, so I went back inside and pulled the wires clear.
I could then change the wheel in the grinder and cut out the rot.

Cutting away the rot showed an inner and outer skin, this was a suprise and I wasn't sure how it all worked. I realised the inner skin was the inside footwell, and the outer skin went down to join it, but it was difficult to tell where they actually joined up.
So I started making two cardboard templates, one to fill the hole in the footwell first, the another to finish the wheelarch to that.


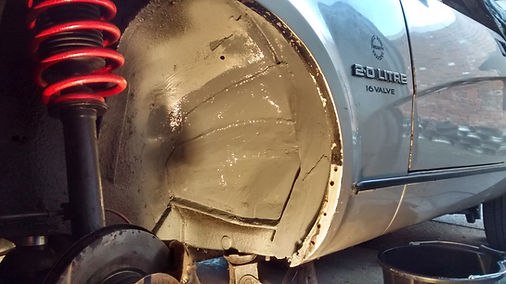
This is how the plates looked welded on, the lower plate goes up and into the footwell, the upper plate is welded to that.
The plates took a good bit of bashing, curving then to fit, they were still a bit off shape, so I welded the tops and hammered the bottoms to fit, tacking and hammering down the edge as I went along. The rot had extended into the outer wing edge also, so I had made the repair panels a bit longer then hammered them over to fit.
I went over the lower welds again just to make sure, then ground the welding down.


I gave the repair another quick clean up, then brushed on a good thick metal primer, this will do as a seam sealer, and it'll run into any gaps in the welding, let that dry then another good lash of primer and the job is done.
I checked inside and the footwell looked neat, I considered welding it up inside too, but it didn't need it, and my friend was happy with the job.
He'll primer the inside, tidy up the wiring, glue the underfelt down, and give the inner wing some underseal and waxoyl, so it should last a good while.
I was surprised how complex this repair was, it only looked like a little hole!