KEEPING
DELTAS
DRIVING
Lancia Delta Integrale specialists and enthusiasts
TPS
TPS

back to basics

Recently our John remotely diagnosed a Lancia Delta's poor starting as a misaligned TPS, he once had the same problem on his Evo1 and a TPS adjustment fixed the poor running.
On a Lancia Delta, poor starting and running can be caused by the throttle position sensor, TPS, not being correctly adjusted. The TPS measures the throttle butterfly position and converts it to electronic values for the ECU, the ECU can then use that, and inputs from other fixed sensors, to adjust injector fuel delivery and engine
running parameters.
John in his favourite place, up to
the elbows in a warm motor.
The Weber-Marelli PF09 TPS was used on several different cars, it's a manually adjusted variable resistor with 3 terminals, it has an internal contact, the wiper, which acts on a curved variable resistance strip.
The internal wiper is rotated by the throttle butterfly spindle extension,
as the wiper moves on the resistance strip, the voltage value sent to
the ECU is adjusted.
The PF09's resistance is 450ohms maximum when closed, and 80ohms when the throttle is fully open. This gives a straight line rise of voltage to the ECU from the idle voltage of 0.5 volts.


By the book.. Lancia manual shows TPS adjustment,
it looks so simple that it can't be true! It does work though,
and can be checked with test equipment.

The Delta's primary ECU input is from the MAP sensor(s), manifold absolute pressure. As the TPS is a manually adjusted sensor, errors can arise that effect the car's running, values sent to the ECU don't meet the expected parameters sent by other fixed sensors.
Specific TPS voltage values can be measured with electronic equipment, but not everyone has this equipment, including me!
The Lancia Delta manual shows how to adjust the TPS manually. Slacken off the 2 x 7mm bolts securing the TPS to the throttle body until the TPS is free to rotate on its mountings.
Turn the TPS left and right 2 or 3 times, then allow the throttle return spring and the internal TPS spring to balance each other out and return the sensor to its correct central position.
You can then mark the correct position with Tippex, in case you move the unit, then tighten up the 2 small bolts, and that's it!
The sensor rotates through 90 degrees and has to signal a difference of 370ohms resistance during that short travel, so correct adjustment is important.
Before this exercise I had run the car up to warm temp.
After the adjustment I restarted the car, John's Evo1, it fired after a couple of turns and settled to a good idle, the engine picked up well then returned to a steady idle. I haven't road tested it yet.
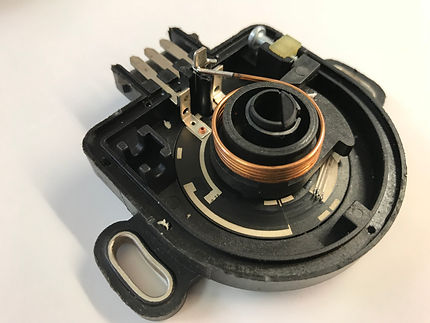
I had a spare TPS, I took it apart so we can see what goes on inside, let's have a look...


Only slacken the securing bolts until the TPS is free to rotate, don't remove them. The lower bolt is difficult to reach, you'll drop the little spanner while doing this, so be ready with a torch and magnetic probe or a bent coat hanger.
On the clean bench I opened the spare TPS sensor, the 2 halves are secured with little threaded rivets, so it's not difficult to split the case. A foam gasket fits between the case halves to keep it dry inside


Here's what inside, a keyway hole for the throttle spindle, 3 connecting terminals, the rotating arm and the return spring. This spring is quite strong and has a good returning force.
The internal idle adjustment stop can be seen.


Here you can see the composite resistance strip
and the 3 pronged wiper, this strip and the wiper heads can be very carefully cleaned with a Qtip and a little switchgear contact cleaner.
The contact arm rotates through 90 degrees, and runs from 450 to 80 ohms in that distance, so the rheostat strip needs to be in good condition

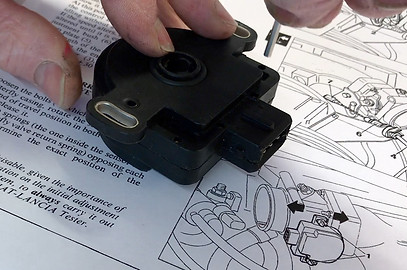
The sensor can be reassembled by first locating the foam gasket in the case groove, it has a sticky side, then placing the 2 halves together.
When that's done insert the little rivets in their holes, and drive them in with an Allen key , or similar flat ended tool.
The FP09 unit is tough and long lasting, it works faithfully in a very hostile environment. The simplicity of the sensor and the sensible mounting arrangement, make correct adjustment quite simple to achieve.

